I just stumbled upon this website and had to share it! The host, Daniel Klein, is a chef with an interest in "adventurous and sustainable eating." He and camerawoman Mirra Fine filmed 52 short episodes (about 5 to 10 minutes each) exploring topics relating to that theme, from spear fishing to community gardening, from tapping maple trees to hunting squirrel. (I haven't watched that one yet!) The unique characters really keep things entertaining. Plenty of recipes, too. Beware though - some of these videos are not for the squeamish! (I only made it half way through the "Meat" episode, and I'm not generally very sensitive.)
I've watched about half the episodes over the past 12 hours, and these are two of my favorites... so far. Enjoy!
The Perennial Plate Episode 3: A trip to Milan, MN from Daniel Klein on Vimeo.
The Perennial Plate Episode 22: A very community garden from Daniel Klein on Vimeo.
Saturday, March 26, 2011

Thursday, March 24, 2011
A Note to Urban Gardeners
I just read this article - Please take a moment to look it over if you're planning to plant a garden in an urban area this spring, if your home was built before 1977, or if your garden will be next to a roadway.

If you're worried that you may have lead or other heavy metals in your soil, you can send a sample to a lab for testing - The cost is only $10.
Don't let a little lead stop you from planting, though! You could fill some raised beds with fresh soil, plant in pots, or just make sure you wash your veggies well before eating.
Growing your own organic produce is the most delicious way to positively impact our planet!

If you're worried that you may have lead or other heavy metals in your soil, you can send a sample to a lab for testing - The cost is only $10.
Don't let a little lead stop you from planting, though! You could fill some raised beds with fresh soil, plant in pots, or just make sure you wash your veggies well before eating.
Growing your own organic produce is the most delicious way to positively impact our planet!
Sunday, March 20, 2011
Babies!

My tomato seedlings are coming up nicely! After a full week, they have nearly all "hatched," as have the Brussels sprouts, impatiens, Mexican sunflowers, and "Purple Mystery" flowers. So far only one marigold (although the seed packet was market 2008, so I didn't expect much) and two black-eyed Susans have appeared.
I am finally seeing signs of life in the hibiscus, eggplant, and pepper pods as well, so hopefully those sprouts will be up in a day or two.
Since most of my sprouts are up, I've gone ahead and propped open the lids on my greenhouse boxes to allow more air to flow through and to prevent too much moisture on the leaves. I simply set the lids kind of ajar, so that the corners are open for airflow, although the sunflowers and Brussels sprouts are getting so tall that I may have to lift the lids up higher somehow.

Tuesday, March 15, 2011
Starting Seeds Indoors
I know that the idea of starting seedlings indoors is intimidating to some people and too much trouble for others. If that's the way you feel, then you can just stop reading this blog right now.
No no! Just kidding! You should keep reading and see how easy it is!

(1) Dirt. These pellets are the easiest option - No mess whatsoever. I bought a box of 36 for $1.99, although I know I bought them in a bag on sale for much less last year. You don't need any fancy container - That styrofoam thingy that your eggs came in is perfect.

(2) Seeds. You can buy a packet in person or online in about a gazillion places. Or you could buy an organic vegetable, remove the seeds, dry them on your counter for a couple of days, voila.
(3) Water.

Ain't she a cutie? I'm using these seed starter boxes that I think will run you about $6. (Buy them on sale at the end of the season if you can.) They're great if you're planting 20 or more seeds, and come in a variety of sizes.

Get your pods (or dirt) nice and wet before you add the seeds. I put two seeds in each pod, usually by making a small indent with a toothpick or pencil, dropping the seeds in, and then using the toothpick to cover the seeds with a small bit of moist soil. If you're especially forgetful, working with a preschooler, or both, I recommend covering the pods with paper or rags so that only the row you're planting is visible.

Once you've got them all planted in damp soil, cover them with plastic. If you're not using a container with a lid, simply tent some plastic wrap over them to hold in the warmth and moisture.
You want to place them in INDIRECT sunlight, meaning a bright room, but not in a place where the light will actually be on them (or they'll burn up under the plastic.) I put mine in a north facing window, which is light all day but never bright.
And if you're planting more than one crop, DON'T FORGET TO LABEL!

Now standing next to your seeds, spread your feet so they're shoulder width apart. Bend slightly at the knees and at the waist, so that you're leaning over them at a 72 degree angle. Wait. As soon as you see a few little sprouts pop up, come and check back with me.

No no! Just kidding! You should keep reading and see how easy it is!
You need three things:
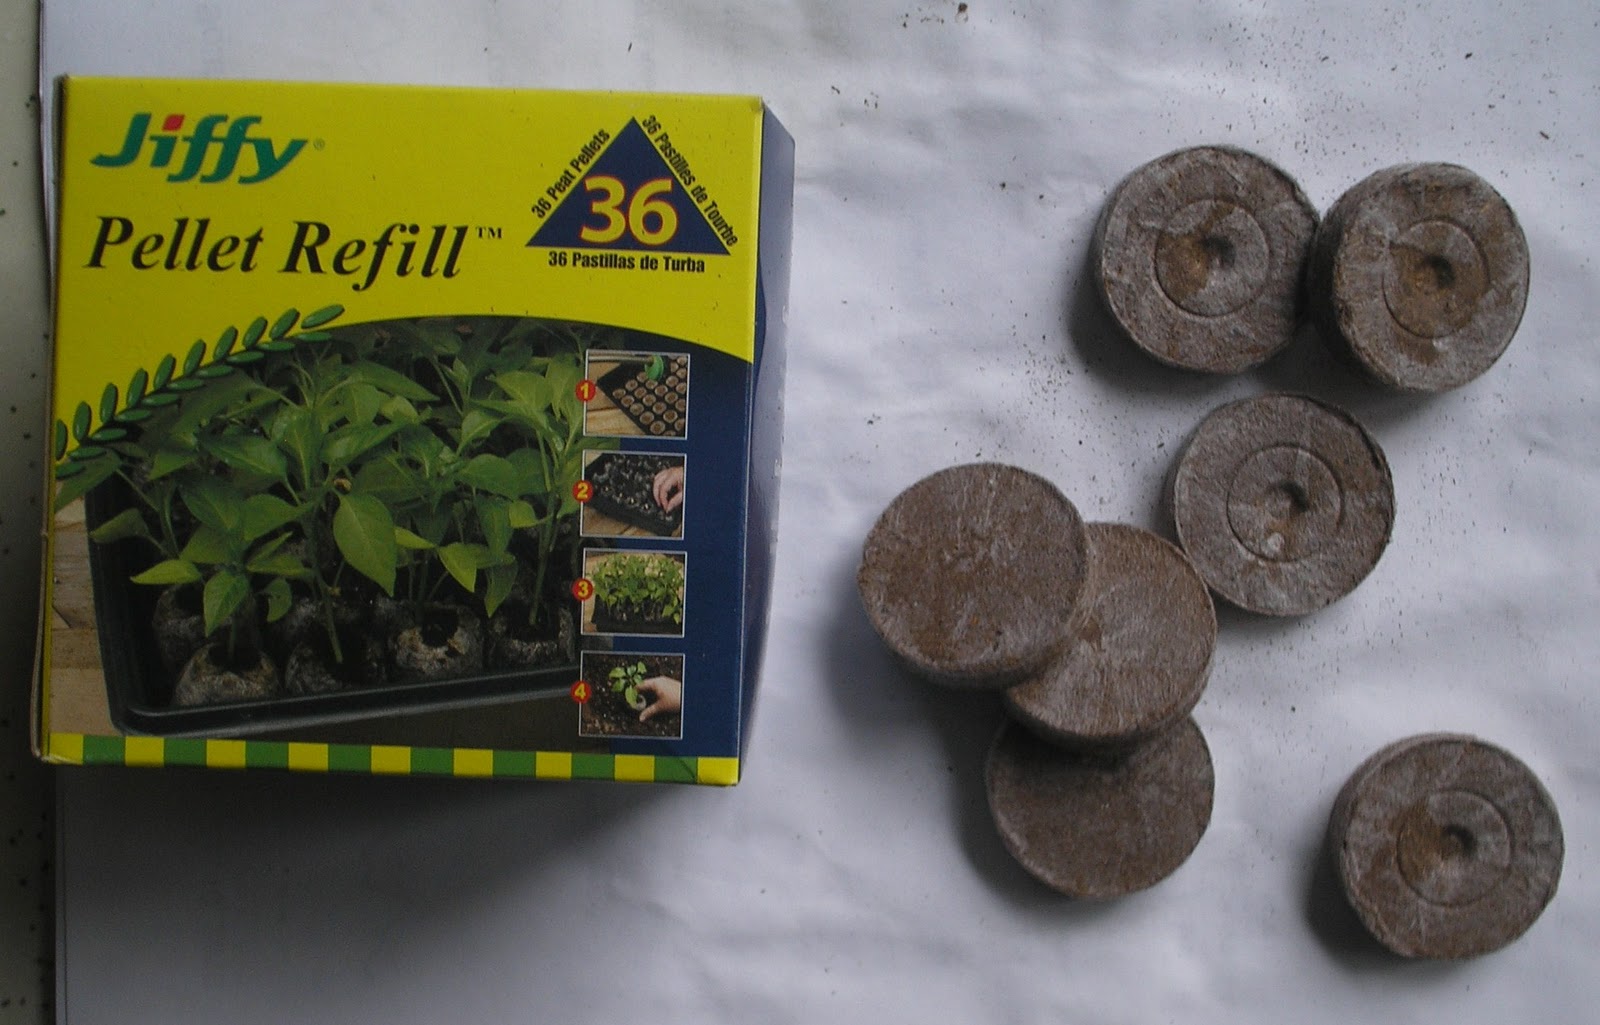

(2) Seeds. You can buy a packet in person or online in about a gazillion places. Or you could buy an organic vegetable, remove the seeds, dry them on your counter for a couple of days, voila.
(3) Water.

Ain't she a cutie? I'm using these seed starter boxes that I think will run you about $6. (Buy them on sale at the end of the season if you can.) They're great if you're planting 20 or more seeds, and come in a variety of sizes.

Get your pods (or dirt) nice and wet before you add the seeds. I put two seeds in each pod, usually by making a small indent with a toothpick or pencil, dropping the seeds in, and then using the toothpick to cover the seeds with a small bit of moist soil. If you're especially forgetful, working with a preschooler, or both, I recommend covering the pods with paper or rags so that only the row you're planting is visible.

Once you've got them all planted in damp soil, cover them with plastic. If you're not using a container with a lid, simply tent some plastic wrap over them to hold in the warmth and moisture.
You want to place them in INDIRECT sunlight, meaning a bright room, but not in a place where the light will actually be on them (or they'll burn up under the plastic.) I put mine in a north facing window, which is light all day but never bright.
And if you're planting more than one crop, DON'T FORGET TO LABEL!

Now standing next to your seeds, spread your feet so they're shoulder width apart. Bend slightly at the knees and at the waist, so that you're leaning over them at a 72 degree angle. Wait. As soon as you see a few little sprouts pop up, come and check back with me.

Monday, February 28, 2011
Corn Container Maze!

YOU CAN GROW CORN IN A CONTAINER!
How crazy is that?
And if your balcony or patio is large enough, and if you have several long, rectangular containers placed in a well thought out design, then you could create your own corn maze!
That would be so awesome! (I'm talking to you, Jen!)
This is the final installment of our "Garden of Jen" container gardening series. For those of you who don't know, Jen is a nice midwestern girl now living in Oregon. I can only assume that her summers are spent despondently perusing independent book stores, drinking locally brewed organic beer, and wandering the beach in despair. Not an acre of sweet corn in sight. Tragic!
I'll save you, Jen! Save you with some delightful Blue Jade Sweet Corn!

If you're not so sure about the blue, you might also try Tom Thumb Popcorn, which is yellow, ornamental, and good for coastal and short season areas. Dwarf 3 1/2 foot plants produce one to two ears that measure about 4" long.
Here's my note of caution regarding corn of any size or type: Animals love this stuff. Birds, squirrels, mice, you name it. I've really been wanting to grow popcorn in my garden, but don't have room to grow enough for ALL of us. The pests will eat it before you get a chance, so grow a few stalks for fun or dozens of stalks for food, but don't think you'll be able to grow just a few stalks and have any kind of harvest.
Not that I'm trying to discourage you! I suppose a balcony cat or realistic scarecrow could make all the difference!
I hope I've managed to make a convincing argument for container vegetable gardening! There is so much that you can grow in, really, any space at all. A corn maze would be magical, of course, but a potted herb on the window ledge is a perfectly respectable start!

Check back for details on when and how to start your seedlings indoors...
Saturday, February 26, 2011
You Say Potato, I Say Container
Here's something that sounds so fun and easy, I'm going to have my four-year-old try it this summer:

Grow fancy fingerling potatoes!
In a bucket!

Or a bag!

Or I could build a "potato condo," but I'm not going to call it that!
Here's the simplest way possible to grow yourself some:
About the container:
You want something with really good drainage. Potatoes like to stay damp, but not wet. When you water, you want to make sure you really soak them, but if they sit in water they'll rot. So, every extra drop needs to find a way out. If you have to make your own drainage (as with a bucket), simply drill or puncture some holes in the bottom of the container. Next add a layer or two of rocks, styrofoam packaging material, or broken terra cotta, and then soil. Ideally you'll use potting soil mixed with a little organic manure, compost, or vermiculture, but take your dirt where you can get it. They like full sun, but if your container is dark in color you might end up overheating them. The bigger the container, the better. A lot of people use burlap bags, garbage cans, buckets, plastic storage containers, big flower pots, or garbage bags. If you can, keep the container up off the ground by setting it on some bricks.
 I saw of few of these wooden bushels at the thrift store the last time I was there. I wanted to buy them, but didn't think I had any use for them. I think they'd be just perfect for containing my potato garden! I'll have to go back and see if they're still there.
You can harvest the potatoes when the soil finally reaches the top of the container, or once the season draws to a close. Just tip the container over and your whole crop will tumble out at your feet!

Grow fancy fingerling potatoes!

In a bucket!
Or a bag!

Or I could build a "potato condo," but I'm not going to call it that!
Here's the simplest way possible to grow yourself some:
- Go to the grocery store or farmer's market and buy some organic fingerling potatoes.
- Leave a few of them in a cool, dark place for a few weeks.
- When they start to bud, cut them into pieces so that each piece has 1-2 buds. Let them sit out for a few days until the cut ends are dry and discolored.
- Find a container (see details below).
- Put a few inches of soil into the container and add the potato pieces, bud side up. Cover with another inch of soil, water thoroughly, and place in a sunny location.
- When the stems are 6-8 inches long, add more soil so that just the leaves are visible. Repeat as the plants continue to grow.
About the container:
You want something with really good drainage. Potatoes like to stay damp, but not wet. When you water, you want to make sure you really soak them, but if they sit in water they'll rot. So, every extra drop needs to find a way out. If you have to make your own drainage (as with a bucket), simply drill or puncture some holes in the bottom of the container. Next add a layer or two of rocks, styrofoam packaging material, or broken terra cotta, and then soil. Ideally you'll use potting soil mixed with a little organic manure, compost, or vermiculture, but take your dirt where you can get it. They like full sun, but if your container is dark in color you might end up overheating them. The bigger the container, the better. A lot of people use burlap bags, garbage cans, buckets, plastic storage containers, big flower pots, or garbage bags. If you can, keep the container up off the ground by setting it on some bricks.

You can harvest the potatoes when the soil finally reaches the top of the container, or once the season draws to a close. Just tip the container over and your whole crop will tumble out at your feet!
Thursday, February 24, 2011
Container Vegetables: Peppers and Tomatoes
I know this is the post you've been waiting for! Let's start with peppers:

If you like 'em hot, you're in luck! Here's a simple rule of thumb with peppers: the smaller the fruit, the smaller the plant. As hot peppers of all varieties tend to be much smaller than sweet peppers, you should have no trouble growing them in a container. You'll harvest more than you can eat, even from one plant. Try making your own hot sauce or crushed red pepper!
Sensitive taste buds? No problem! You can grow plenty of sweet bell peppers in a container as well! (Just make sure it's of a decent size, and only one plant per pot.)

Peppers and tomatoes will need to be started from seed indoors six to eight weeks before last frost, and then moved outside into full sun when it's warm enough. If you only want a couple of plants, you may be better off saving yourself the hassle and buying small plants from a nursery. (Wait 'til just after Mother's Day, when the prices drop.) Of course if you're feeling ambitious, there's nothing better than watching those cute little seedlings sprout up while there's still snow on the ground outside!

Tomatoes will need staking, so find yourself a nice round pot large enough to hold a tomato cage. Your local nursery - if it's any good at all - will have at least one or two varieties of "patio tomatoes" which are recommended for growing in pots and may not even need staking. Feel free to experiment with other varieties, though. Any tomato will grow in a pot with enough space and support!
If you're looking for something a little more interesting, the good people at Seed Savers Exchange have a few recommendations for you. Try growing some really unique Cream Sausage, Green Sausage, Czech's Bush, Nebraska Wedding, or Silver Fir Tree Tomatoes!
Another option for growing both peppers and tomatoes in containers is the Topsy Turvy Planter - As seen on TV! My neighbor grew a fine crop of cherry tomatoes on one of these last summer. I can't vouch for how a plant with larger, heavier tomatoes would do, though.

Regardless of type, size, or turvy-ness, all tomatoes and peppers will appreciate hot weather and full sun!

If you like 'em hot, you're in luck! Here's a simple rule of thumb with peppers: the smaller the fruit, the smaller the plant. As hot peppers of all varieties tend to be much smaller than sweet peppers, you should have no trouble growing them in a container. You'll harvest more than you can eat, even from one plant. Try making your own hot sauce or crushed red pepper!
Sensitive taste buds? No problem! You can grow plenty of sweet bell peppers in a container as well! (Just make sure it's of a decent size, and only one plant per pot.)

Peppers and tomatoes will need to be started from seed indoors six to eight weeks before last frost, and then moved outside into full sun when it's warm enough. If you only want a couple of plants, you may be better off saving yourself the hassle and buying small plants from a nursery. (Wait 'til just after Mother's Day, when the prices drop.) Of course if you're feeling ambitious, there's nothing better than watching those cute little seedlings sprout up while there's still snow on the ground outside!

Tomatoes will need staking, so find yourself a nice round pot large enough to hold a tomato cage. Your local nursery - if it's any good at all - will have at least one or two varieties of "patio tomatoes" which are recommended for growing in pots and may not even need staking. Feel free to experiment with other varieties, though. Any tomato will grow in a pot with enough space and support!
If you're looking for something a little more interesting, the good people at Seed Savers Exchange have a few recommendations for you. Try growing some really unique Cream Sausage, Green Sausage, Czech's Bush, Nebraska Wedding, or Silver Fir Tree Tomatoes!
 |
| Green Sausage Tomato |
 |
| Nebraska Wedding Tomato |
Another option for growing both peppers and tomatoes in containers is the Topsy Turvy Planter - As seen on TV! My neighbor grew a fine crop of cherry tomatoes on one of these last summer. I can't vouch for how a plant with larger, heavier tomatoes would do, though.
Regardless of type, size, or turvy-ness, all tomatoes and peppers will appreciate hot weather and full sun!
Subscribe to:
Posts (Atom)